Thursday, August 24, 2006

Walk-in closets....sigh...a girl can dream, can't she?

Here are sketches of our proposed addition. We are planning to bump out the existing kitchen/bathroom to the north about 10 feet and add a bathroom and laundry room on the first floor, then a bathroom and (gasp!) master walk-in closet on the second floor.

Feast your eyes on these babies! :) Aren't they beautiful?

The two potential layouts for the first floor laundry/bath...I'm partial to the one on the left because it has all that glorious counter space!


And the two potential layouts for the second floor bath/closet....these are very similar. I think the only difference is that the room sizes change a wee bit from layout to layout.

Yippee! It worked better than I thought it would!

Aren't you just ECSTATIC when something actually lives up to its own hype? I know I am! Take for instance my ongoing quest to have sparkling clean white laundry. Between the minerals in our well water and the natural tendency of white laundry to become dingy over time, I thought I was fighting a losing battle. Optical brighteners didn't really do anything. Bleach just turned them yellow. Oxygenating detergents didn't do anything. Nor did copious amounts of Spray&Wash. Ugh. How frustrating.

Enter my book of old-fashioned/frugal remedies and simple country living. I flipped through to see if there was any information to be found on laundry. In fact, there was! Baking soda and white vinegar was supposed to do the trick. There were no real measurements listed, so I just took a bucket and put about 1/4 cup of baking soda in, then poured probably 2 cups of white vinegar. First of all, be forewarned: this stuff FIZZ-FIZZ-FIZZES and if you don't have enough "headroom" you could end up with quite the volcano!

After it had stopped making with the fizz, I simply immersed those pieces that were dingy to my eyes, let 'em sit for a few seconds, then tossed them into the washer. When I began pulling pieces out to put them into the dryer, I could hardly believe my eyes. All of the white laundry looked brighter. Every single piece. I guess from the soda/vinegar clothes swishing around with the rest of it. And the items that been dunked in the solution came out super white. Success at last!! I'm a believer.

Now if I could just find something in that book about how to do major home improvements --you know, like patching plaster, stripping wallpaper, repointing a foundation, stuff like that -- with baking soda and vinegar.

Thursday, August 17, 2006

Good news on the cat front

I don't remember if I posted that our orange foofy cat, Romeo, has diabetes. He was diagnosed about 9 months ago, and we think the diabetes is a direct result of a steroid our previous vet had him on for a chronic gum inflammation. Fast forward to Romeo's first visit at the new vet--we had brought him in because he'd lost some weight pretty rapidly, and was also losing fur. Immediately (before she even introduced herself) she says to me "I think your cat is diabetic...have you ever tested his blood sugar?" I didn't think we had, so she drew blood and tested. His numbers were through the roof! Normal is anywhere from 80-100ish, and he was over 400. Still, she was reluctant to put him on insulin in the hopes that, once we stopped giving him the steroid, his diabetes would resolve itself. Nope. No luck there. His glucose numbers continued to be very high, he continued to lose hair and act lethargic, and we continued to worry. I really didn't want to start him on insulin because it's scary enough to use with humans, who are capable of self-testing and all that. We home-test Romeo, but the equipment is not as accurate for kitties as it is for people, so there's some worry there. More than anything I was worried about giving him too much because I made an incorrect judgement.

Deep breaths. Deep breaths. Deep breaths.

At long last, I'm overjoyed to report that his diabetes seems easily controlled with diet. No longer on free fed kibble, Romeo now gets two square meals a day of yummy diabetic canned food mixed with chicken baby food (OK, so he's a little spoiled. What can we say? We love the big lug.). His numbers are now consistently between 90 and 120--and he's not on insulin. We can definitely live with those.

Why I got plastered (AKA the before pictures of the Bathroom of Frankenstein)

Well, I finally got around to resizing these for the web. Behold, the before pictures! I cannot believe what condition our walls were in before I got down and dirty with lime. :-)

This is what it all looked like before demo. I wish you could see just how ugly and bulging the walls were. You also can't see the areas where the plaster had been reduced to simple sand that trickled out steadily into the bathtub (good thing the tub is too small to take a good bath in anyway...). Alas, those endearing aspects simply did not photograph well. But you can sure see the cracking, which had progressed far beyond the hairline stage.


I began chipping away small pieces in the worst spots . . .

And soon discovered that we had two full walls' worth of "worst spots"! ACK!

This picture shows what things looked like after the scratch coat and the brown coat. After these finished curing I ended up having to skim coat the entirety of both walls in order to get a decent finish. And, I'll admit it — I got uber lazy on the skim coat for the back wall. Since we put up a shower liner to avoid having rust stains all over the place again, I figured no one would really ever see that wall, so my efforts to really skim coat that smoothly and nicely were....ummm, shall we say less than robust. Still looks a whole heckuva lot better than it did, though! I'm not sure if I have any pictures of the skim coat before painting. Skim coating, for whatever reason, turned out to be an even filthier job than doing the first two coats!

I couldn't be happier that we're going on a couple of months, and the plaster seems to be holding up well. Rapping on the wall yields a nice solid sound, and it no longer makes that crumbly sound every time you accidentally hit it with your [insert body part here].

Monday, August 14, 2006

Ponderings on karma

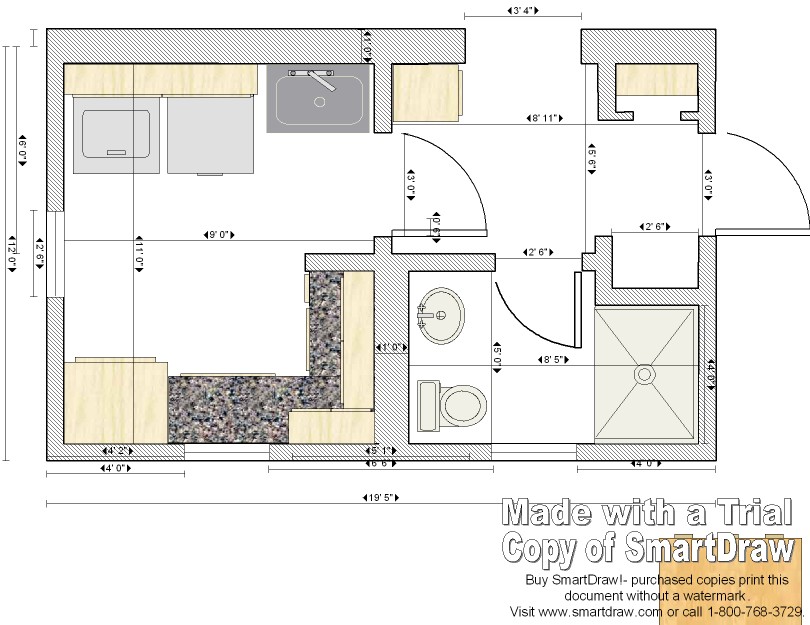
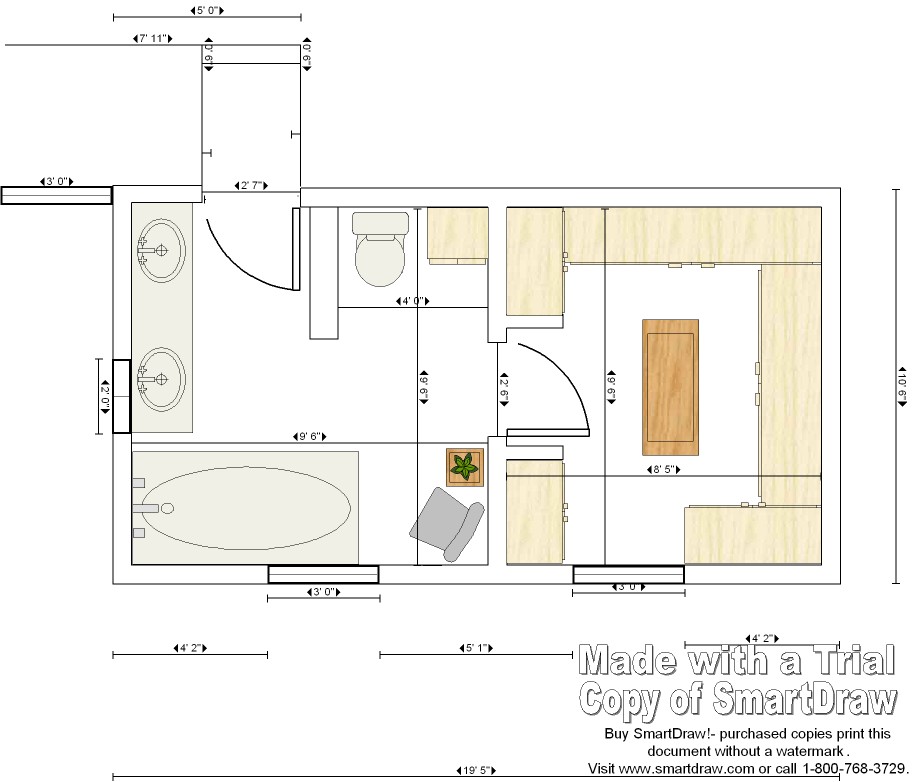
Well, the appraiser has been through, and while there were no real surprises (we won't be financing our entire restoration from the sale of an old pair of pliers found in the crawl space...), the bottom line is that we have some very nice pieces.

Most of them will be staying with us, but there are some that V and I are really torn about. Like I mentioned in a previous post, the huge cedar chest is chock full of all sorts of lovely linens and textiles. What to do with those? We're trying so hard to be true to the original intent of the house and its owners...so what does that mean for the baby bonnets? Or the fine linen towels? I'd love for them to go to someone who can appreciate them and give them the kind of home they deserve. But would I just be asking for a heapload of bad karma if I sold them? Should they be donated to a museum, if I can find a taker? That wouldn't help the financial situation with the house, though.

Sometimes I wish I didn't love this house so much. Then I wouldn't give a rat's behind about what we do with the contents that we cannot use. I don't want to live in a museum, but nor do I want to sell or give away things that truly should stay with the house.

All that said, I don't think I've posted any pictures of what we found in the chest. If I've already posted these, my apologies but too bad. You'll just have to look at them again!

I'm too tired to really caption these with any care or accuracy. Hopefully the pictures will speak for themselves.
This is a Victorian (?) sash belt with enameled buckle. LOVE this piece, just love it. No idea what to do with it because it sure wouldn't fit around my waist! (it's about 20" give or take)

Scarf or runner of some sort? No clue.


An absolutely GORGEOUS child's dress.


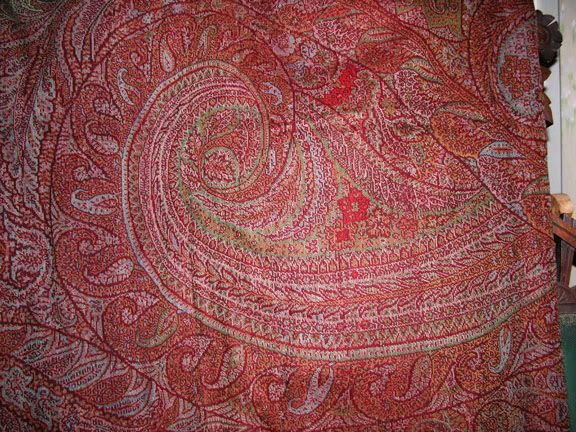
I was pretty clueless about this piece until the kind folks over at the eBay forums told me it's probably a piano scarf or a Victorian paisley shawl. It's about 6x6 or maybe 7x7 and is simply beautiful.


And here's a link to the whole shebang--at least what has been photographed and/or documented in some way. Mostly linens and porcelain. If you see anything worth millions please let me know. ;)

http://s76.photobucket.com/albums/j13/ginam01/?action=view&slideshow=true

Thursday, August 03, 2006

Would you buy organic (or at least natural ingredient only) dog shampoo?

My friend and I have been talking about ways to make some extra cash and hopefully in the process build up a business that is strong enough for us to cut back a little on the ol' work schedules as they are right now. Work just has not been fulfilling these last several months. I'm finding myself very apathetic about marketing. If I could do preservation work full-time, I'd love it, but it's a hard field to break into, especially for woman and especially in the trades. We aren't in a place financially where I can just leap into a complete career change, but the more time I spend doing things other than marketing, the antsier I get to make the switch!

I'd call what I'm going through a midlife crisis, but I'm not quite to midlife yet. I guess I'm having a pre-midlife crisis. Anyway, we came upon this idea to make earth-friendly, natural, as organic as possible, pet products: shampoos, detanglers, treats, even collars/leashes and sweaters and the like. Since she has a dog and we have the cats, we have our test subjects all lined up, and we have friends with ferrets, birds, and rats/hamsters/guinea pigs. So we basically cover the spectrum of common pets. We're going to start working in our test kitchen this week, trying to develop a good basic line that is expandable if the need arises in the future.

Any pet owners out there? Would you spring for stuff like that, as long as it was not prohibitively expensive? We're counting on you to say YES! :)

Bathroom of Frankenstein

Maybe I shouldn't say it that way. It's not really that bad. But our bathroom is definitely still not entirely up to snuff. The plaster work I did is still holding up, even the patches of the patches (see my earlier angst-ridden posts about my hard work on our plaster and the subsequent heartbreaking cracks that appeared . . . ), but there's still a ways to go.

It's been too bloody hot to break out the heat gun, and we have not yet knuckled under and actually purchased a Silent Paint Remover (it is on the short list, especially since we borrowed one for a time). Thus, the trim is still all canary yellow, which looks positively smashing against the rust-colored walls (rust colored to match the rusty mineral water from our well--if you can't beat it, join it!). There is one strip, about 2 feet long and 4 inches wide, that I stripped with the heat gun before our temperatures became like those on the surface of the sun. I just won't strip paint when the temperature is in the triple digits.

And then there's the area behind the toilet. We don't particularly want to take the toilet apart in order to plaster and paint behind it, so what we're thinking of doing is (shhhhhh!) a quick-and-dirty fix that will improve it aesthetically, but that won't require dismantling or moving of major fixtures. We're going to find a thin piece of plywood, paint it the appropriate rust color, slide it behind the toilet, and screw it into the wall. I know, I know, it's not the ideal way to go about things, but this bathroom will, very hopefully, be completely redone and enlarged in the next year or two, so I think we can make ourselves live with a quick fix. Most people probably won't even notice by the time we're done, and we have an over-the-toilet etagere because of our total lack of storage in the bathroom. The etagere will also hide most of our sinful coverup.

Don't tell anyone. I trust that my secret is safe with you!